软件安装与卸载
软件安装
.rpm格式:二进制格式,相对于window下的.exe文件.tar.gz:二进制源码包,需要借助于gcc 编译器进行源码编译安装yum:自动解决依赖问题安装软件查询
- 基本语法:
rpm -qa-q(query)表示查询-a(all)表示所有
- 查询指定软件:
rpm -qa | grep 软件名称|管道,可以针对前面的结果进行二次筛选grep匹配
- 卸载软件
- 基本语法:
rpm -e 软件名称 (软件名称可以只选到软件名称)
- 基本语法:
- 软件安装
- 先解压
- 进入安装目录
- 编译
- 安装
Apache 安装
- 进入LAMP安装目录
- 使用tar命令实现解压功能
tar -zxvf httpd-2.2.11.tar.gz
- 进入到解压目录并编译(需安装gcc)
cd httpd-2.2.11./configure --prefix=/usr/local/apache --enable-so
- 安装
make && make install
- 配置加载PHP
- 进入到Apache的bin目录启动Apache:
[root@localhost usr]# cd /usr/local/apache/bin - 修改Apache配置文件:
[root@localhost bin]# vim ../conf/httpd.conf- 开启并修改域名:
ServerName localhost:80
- 开启并修改域名:
- 重启Apache:
- 测试
- 关闭防火墙:
service iptables stop;服务器重启之后防火墙会再次开启。实际应用场景可修改编辑(/etc/sysconfig/iptables文件,开启SSH端口22,或tcp80,数据库3306可以加上如下内容:-A RH-Firewall-1-INPUT -m state –state NEW -m tcp -p tcp –dport 22 -j ACCEPT) - 直接输入IP地址,测试
- 在命令行下使用curl工具:
/usr/bin/curl http:127.0.0.1 - 通过端口的方式:
netstat -tunple|grep 80 - 通过进程方式:
ps - aux | grep httpd
- 关闭防火墙:
- 报错排错:

1
2
3
4
5
6
7
8
9
10
11
12
13
14
[root@localhost bin]# ./apachectl start
(98)Address already in use: make_sock: could not bind to address [::]:80
(98)Address already in use: make_sock: could not bind to address 0.0.0.0:80
no listening sockets available, shutting down
Unable to open logs
[root@localhost bin]# netstat -tunple|grep 80
tcp 0 0 :::80 :::* LISTEN 0 59332 22963/httpd
udp 0 0 :::57780 :::* 29 12263 1361/rpc.statd
udp 0 0 fe80::20c:29ff:fe04:2b3c:123 :::* 0 13141 1573/ntpd
[root@localhost bin]# pkill httpd
[root@localhost bin]# netstat -tunple|grep 80
udp 0 0 :::57780 :::* 29 12263 1361/rpc.statd
udp 0 0 fe80::20c:29ff:fe04:2b3c:123 :::* 0 13141 1573/ntpd
[root@localhost bin]# ./apachectl start
PHP安装
安装zlib压缩库
- 进入LAMP安装目录
1. `[root@localhost home]# cd /home/LAMP` - 使用tar命令实现解压功能
1. `[root@localhost LAMP]# tar -zxvf zlib-1.2.5.tar.gz` - 进入到解压目录并编译(需安装gcc)
1. `[root@localhost LAMP]# cd zlib-1.2.5` 2. `[root@localhost zlib-1.2.5]# ./configure` - 安装
1. `[root@localhost zlib-1.2.5]# make && make install`安装libxml2
- 进入LAMP安装目录
1. `[root@localhost home]# cd /home/LAMP` - 使用tar命令实现解压功能
1. `[root@localhost LAMP]# tar -zxvf libxml2-2.7.2.tar.gz` - 进入到解压目录并编译(需安装gcc)
1. `[root@localhost LAMP]# cd libxml2-2.7.2` 2. `[root@localhost libxml2-2.7.2]# ./configure --prefix=/usr/local/libxml2 -without-zlib` - 安装
1. `[root@localhost libxml2-2.7.2]# make && make install`安装jpeg8
- 进入LAMP安装目录
1. `[root@localhost home]# cd /home/LAMP` - 使用tar命令实现解压功能
1. `[root@localhost LAMP]# tar -zxvf jpegsrc.v8b.tar.gz` - 进入到解压目录并编译(需安装gcc)
1. `[root@localhost LAMP]# cd jpeg-8b/` 2. `[root@localhost jpeg-8b]# ./configure --prefix=/usr/local/jpeg --enable-shared --enable-static` - 安装
1. `[root@localhost jpeg-8b]# make && make install`安装libpng
- 进入LAMP安装目录
1. `[root@localhost home]# cd /home/LAMP` - 使用tar命令实现解压功能
1. `[root@localhost LAMP]# tar -zxvf libpng-1.4.3.tar.gz` - 进入到解压目录并编译(需安装gcc)
1. `[root@localhost LAMP]# cd libpng-1.4.3` 2. `[root@localhost libpng-1.4.3]# ./configure` - 安装
1. `[root@localhost libpng-1.4.3]# make && make install`安装freetype(字体库)
- 进入LAMP安装目录
1. `[root@localhost home]# cd /home/LAMP` - 使用tar命令实现解压功能
1. `[root@localhost LAMP]# tar -zxvf freetype-2.4.1.tar.gz` - 进入到解压目录并编译(需安装gcc)
1. `[root@localhost LAMP]# cd freetype-2.4.1` 2. `[root@localhost freetype-2.4.1]# ./configure --prefix=/usr/local/freetype` - 安装
1. `[root@localhost freetype-2.4.1]# make && make install`安装GD库
- 进入LAMP安装目录
1. `[root@localhost home]# cd /home/LAMP` - 使用tar命令实现解压功能
1. `[root@localhost LAMP]# tar -zxvf gd-2.0.35.tar.gz` - 进入到解压目录并编译(需安装gcc)
1. `[root@localhost LAMP]# cd gd-2.0.35` 2. `[root@localhost gd-2.0.35]# ./configure --prefix=/usr/local/gd --with-jpeg=/usr/local/jpeg/ --with-png --with-zlib --with-freetype=/usr/local/freetype` - 安装
1. `[root@localhost gd-2.0.35]# make && make install`安装PHP
- 进入LAMP安装目录
1. `[root@localhost home]# cd /home/LAMP` - 使用tar命令实现解压功能
1. `[root@localhost LAMP]# tar -zvxf php-5.3.28.tar.gz` - 进入到解压目录并编译(需安装gcc)
1. `[root@localhost LAMP]# cd php-5.3.28` 2. `[root@localhost php-5.3.28]#./configure --prefix=/usr/local/php --with-mysql=mysqlnd --with-pdo-mysql=mysqlnd --with-mysqli=mysqlnd --with-freetype-dir=/usr/local/freetype --with-gd=/usr/local/gd --with-zlib --with-libxml-dir=/usr/local/libxml2 --with-jpeg-dir=/usr/local/jpeg --with-png-dir --enable-mbstring=all --enable-mbregex --enable-shared --with-config-file-path=/usr/local/php/etc --with-curlwrappers --with-apxs2=/usr/local/apache/bin/apxs` - 安装
1. `[root@localhost php-5.3.28]# make && make install`安装MySQL
MySQL使用二进制包安装,已经安装过了的(安装前终止msyqld进程:pkill mysqld) - 进入LAMP安装目录
1. `[root@localhost home]# cd /home/LAMP` - 使用tar命令,使用C指定解压目录
1. `[root@localhost LAMP]# tar -zxvf mysql-5.5.38-linux2.6-i686.tar.gz -C /usr/local` - 进入到解压目录
/usr/local下1. `[root@localhost LAMP]# cd /usr/local` - 创建软连接
使用1. `[root@localhost local]# ln -sv mysql-5.5.38-linux2.6-i686/ mysql` 2. `[root@localhost local]# cd mysql`vim INSTALL-BINARY查看安装提示 - 添加MySQL用户
1. `[root@localhost local]# useradd mysql` - 修改文件权限
1. `[root@localhost mysql]# chown -R mysql.mysql ./` - 安装MySQL
1. `[root@localhost mysql]# ./scripts/mysql_install_db --user=mysql`
2. 成功提示:
- 再次修改权限
1. `[root@localhost mysql]# chown -R root . ` 2. `[root@localhost mysql]# chown -R mysql data` - 复制配置文件
1. `[root@localhost mysql]# cp support-files/my-medium.cnf /etc/my.cnf` 2. `cp:是否覆盖"/etc/my.cnf"? y` - 复制服务
1. `[root@localhost mysql]# cp support-files/mysql.server /etc/init.d/mysqld` - 将MySQL的服务添加到系统服务中
1. `[root@localhost mysql]# chkconfig --add mysqld` - 启动MySQL服务
1. `[root@localhost mysql]# service mysqld start` - 默认安装完成没有密码,修改密码
[root@localhost mysql]# ./bin/mysqladmin -u root password 'newpass'- 如果已经设置了密码可以通过如下方式设置
mysql> set password for 'root'@'localhost'=password('newpass');[root@localhost mysql]# ./bin/mysqladmin -u root password oldpass 'newpass'update user set password = password('newpass') where user = 'root';
- 如果密码丢失了,可以这样:
mysql_safe --skip-grant-tables&mysql -u root mysqlmysql> update user set password=password('new password') where user ='root';mysql>FLUSH PRIVILEGES;
- 打开MySQL客户端
1. `[root@localhost mysql]# ./bin/mysql -uroot -p` 2. `Enter password:` - 报错排错


设置远程登录权限
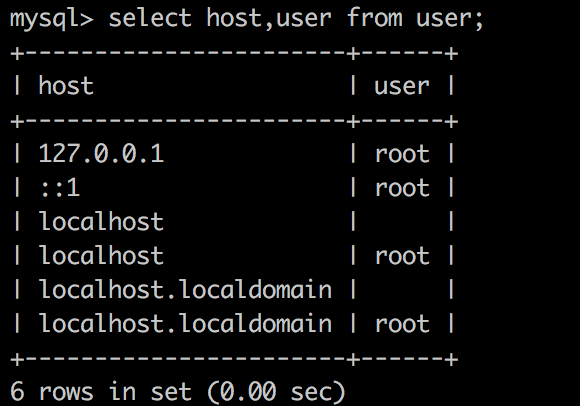
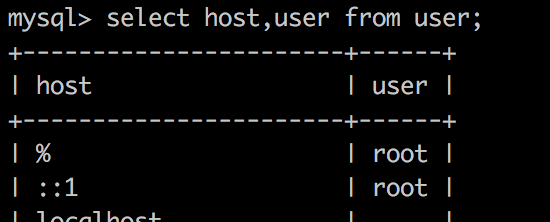
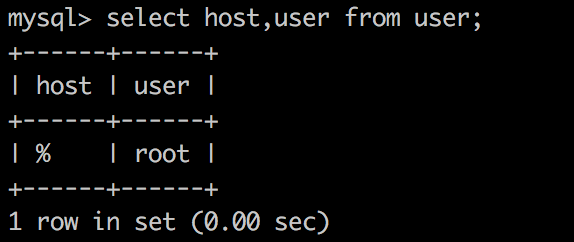
mysql> use mysqlmysql> select host,user from user;
mysql> update user set host='%' where user ='root' and host ='127.0.0.1';
mysql> delete from user where host != '%';
mysql> FLUSH PRIVILEGES;若没有关闭防火墙需要关闭防火墙
ervice iptables stop开启静态IP
1
2
3
4
5
6
ONBOOT=yes
NM_CONTROLLED=yes
BOOTPROTO=static
IPADDR=192.168.34.100
NETMASK=255.255.255.0
NM_CONTROLLED=no